Pre-requisites to connect Dynamics 365 CE Dataverse Web API

To connect Dataverse and Dynamics 365 CE Web API from external Apps such as Power Automate, C#, JS etc. you need to collect some information with you. Follow the steps below.
Step 1 – Register App in Azure Active Directory
The first step is to create an App in Azure Active Directory and copy Client ID, Tenant ID and Client Secret. Follow the below article link to know how to create an app and generate Client ID, Tenant ID and Client Secret.
Open Office.com and login using your organization credential. then click on the Left-Bottom corner All Apps icon. Then click on Admin App. or you can directly navigate to O365 Admin Center using organizational credential.
Once the screen opens Click on Left panel Show All option then choose Azure Active Directory or you can directly navigate to Azure AD by clicking https://aad.portal.azure.com/.
In this screen you have to click on Left Panel Azure Active Directory then chose App Registration.

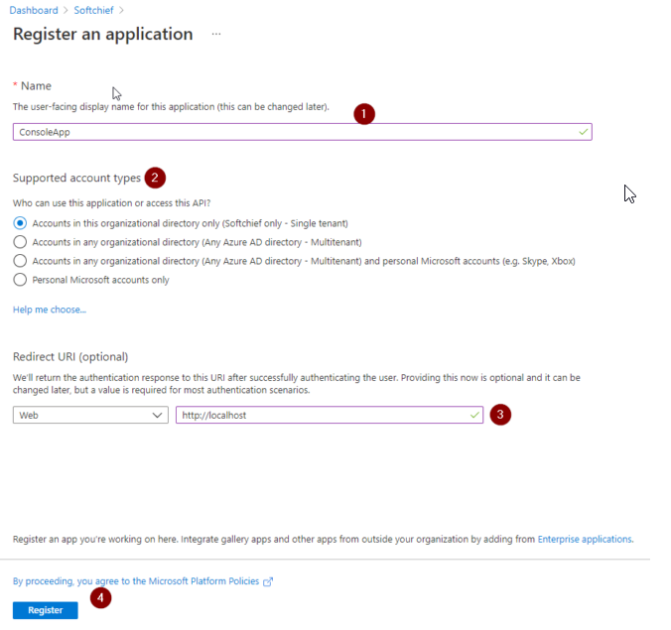
Click on New Registration and provide the below values.
Name : ConsoleApp, Supported Account Type as Single Tenant, Redirect URI as http://localhost you can keep it blank.

Now click on Register. After registration note two things. This two ID we need in our code.
- Application (client) ID: ac0fdb5e-dbba-4587-be68-44c04eb189de
- Directory (tenant) ID: 9e650004-64c2-4599-b4ee-228d0f4ddb1c

Use the copy to clipboard option to copy the values.
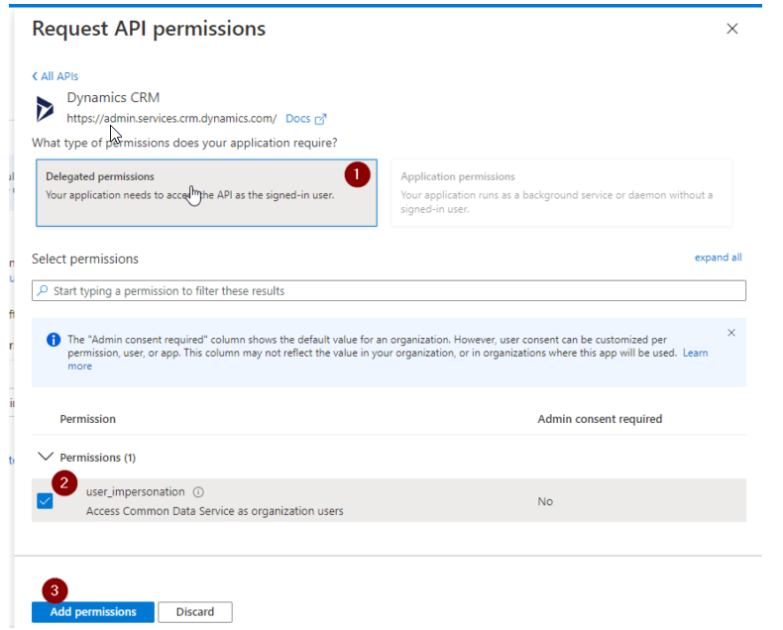
Next we have to provide API permission to the APP. on same App page go to API Permissions option Click on Add Permission and in the list Select Dynamics CRM.

Then Select Delegated Permission. Select the User Impersonation permission. Then click Add Permission button.

Next We have to Grant Admin Consent for the permission. Click the Grant admin consent and click Yes.

Now the status will display as Granted. Now we are ready to process next step.
Next we have to generate a Client Secret for the App. In the App click on Certificates & Secrets. Click on New client Secret.

Provide a name and choose Expires as 24 months and click Add.

Now quickly copy the Secret ID and value. Because if you do not copy after sometime you will not get the value.

For me Secret Value : JgG5FJF0-PFA~9EkSz5-07–_etZlLVFaz and Secret ID is : 2c1241f3-ee00-474f-b765-b2bfe5697d80
This Secret Value is required in our code.
Next Configure An Application user in Environment using Admin Power Platform.
Open the Dynamics 365 (https://yourorg.crm.dynamics.com/) Application and go to Advanced Settings and Choose Security and Select Users. Change the View to Application User and click on Add new User.

After clicking Add new choose the User section as Application user by selecting the arrow icon .

Now provide the Client ID we have copied from Azure Active Directory in the Application ID field and save the record. some other fields will be automatically populated on save.

After this above step of user addition assign a security role to the user by using an existing security role or you can create a new security role.
The best practice is to create a new security role and configure the privileges and access levels that the Application user can perform from Code. For this demo I have assigned as System Customizer Role.

Now we are ready to use App ID, Client Secret from Console Application.
So this way you need to note Client ID, Secret ID and Tenant ID. So you need below to communicate to Web API.
- Tenant : 295c4ed4-87b4-4240-b7d9-460d72775cba
- Environment URL: https://softchiefjuly2022dev.crm.dynamics.com
- Client ID: e1924e0d-151b-4d6c-b427-8216b57b2bf8
- Secret : 76w8Q~eVJm1F_O8_B423FXbEdraHJtPbSu~rvb9S
That’s all. Hope this helps.
Follow my blog for more trending topics on Dynamics 365, Azure, C#, Power Portals and Power Platform. For training, Courses and consulting, call to us at +91 832 886 5778 I am working more for community to share skills in Dynamics 365 and Power Platform. Please support me by subscribing my YouTube Channel. My YouTube Channel link is this : https://www.youtube.com/user/sppmaestro


