Power Automate: Handle Optional Approval Steps Without Creating Separate Flows

Introduction
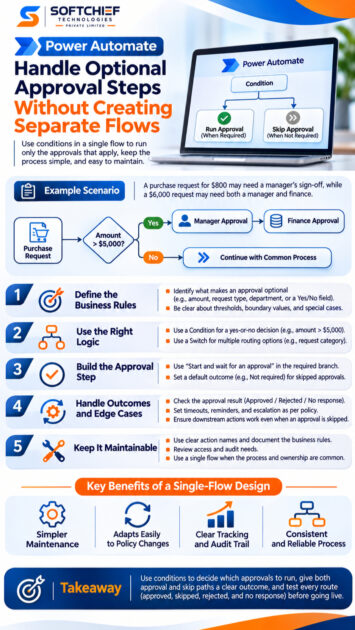
A purchase request for $800 may need a manager’s sign-off, while a $6,000 request may need both a manager and finance. If each route has its own flow, a small policy change can mean updating several places. Power Automate can handle both routes in one cloud flow by checking the request details and running only the approvals that apply.
The key is to make the decision rules clear, track what happened when a step is skipped, and test each path. Consider a hypothetical rule: requests above $5,000 need manager approval; requests at or below that amount can move on without it. The same pattern works for request type, department, or a yes/no field.
Use conditional logic to keep optional approvals in one flow
The core pattern is direct: check a business rule, run an approval if it applies, then continue with the shared process. When the rule doesn’t apply, the flow skips that approval branch rather than repeating the later actions in a second flow.
Power Automate’s Condition action runs actions based on whether a test is true or false. You can use it to compare a request amount with a threshold, as shown in Microsoft’s guide to adding a condition to a cloud flow.
Identify what makes an approval optional
Start by asking the process owner what makes a request require review. The rule might depend on amount, request type, department, or a field such as “Legal review required.” Write down the rule in plain language before you build it.
For the example, the rule is: “If the request amount is greater than $5,000, get manager approval.” Confirm how the flow should treat boundary values, missing amounts, and requests in other currencies. Clear answers here prevent confusing results later.
Choose the right condition or switch
Use a Condition when the flow needs a yes-or-no decision, such as whether the amount exceeds the threshold. A Switch can be easier to read when one field has several possible values, such as routing different request categories to different approval steps.
Keep the logic readable. If a condition starts holding many nested checks, split the rules into separate, named decisions or use a Switch for distinct categories. The goal is to make it easy for someone else to see why an approval runs.
Keep the flow’s main path easy to follow
Place the approval action inside the branch where it’s required. Put common actions, such as updating the request record or sending a final status message, after the condition so both routes can reach them.
Use action names that explain their purpose, such as “Manager approval for requests over $5,000.” Descriptive names make run history easier to inspect and help teammates understand the flow without opening every action.
Build optional approval steps with clear inputs and outcomes
An approval action should give the reviewer enough context to make a decision. It should also return a result that later actions can check, whether the reviewer approves, rejects, or never responds.
Use “Start and wait for an approval” for a straightforward gate
For a basic approval step, add Start and wait for an approval inside the required branch. The action creates the request and pauses that flow run until the approver responds. Microsoft’s approval workflow guide covers the action’s setup and response handling.
Choose an approval type that matches the process. A single reviewer may suit a manager gate; a process requiring agreement from every reviewer needs a type that waits for all assigned approvers. Set the title, assignee, and details so the reviewer can identify the request and understand what they’re approving.
Set a clear default for approvals that are skipped
Before the condition, initialize an outcome variable such as ManagerApprovalOutcome with the value Not required. In the approval branch, set that variable to the approval action’s returned outcome.
Now later steps can tell the difference between an approved request and a step that never ran. If you prefer not to use a variable, record an equivalent status in your request data, but define the skipped value just as clearly.
Decide what happens after approval or rejection
After the approval action, check its outcome with a condition. On approval, continue with the next business action. On rejection, decide whether to stop the process, update the request as rejected, notify the requester, or start another approved business route.
Don’t treat every non-approval as the same event. A rejection is a decision; a timeout or failed action may need separate handling. Store the outcome and, where needed, the approver’s comments for later review.
Add multiple optional approvals without creating tangled branches
A single flow can support several optional reviews if each rule stays distinct. For example, one condition can check whether a manager must approve, and another can check whether finance must review the request.
Evaluate each approval requirement separately
Use a separate condition for each independent rule. The manager review might depend on amount, while finance review might depend on department or purchase type. One approval should not control whether another runs unless the business policy explicitly links them.
For a sequential process, place the next approval after the first one and define whether rejection ends the flow. For independent reviewers, parallel branches can send approvals at the same time. Optionality still needs a clear condition, and the flow must define how to combine the results.
Use variables or structured request data consistently
Choose predictable names for each requirement and outcome, such as NeedsManagerApproval, ManagerApprovalOutcome, and FinanceApprovalOutcome. Use consistent values such as Not required, Approved, and Rejected.
This makes conditions easier to read and helps when you review a failed run. If you store the results in a SharePoint item or another record, keep the field names and status values aligned with the variables.
Prevent skipped actions and edge cases from breaking the flow
A branch that doesn’t run has no approval result to pass forward. Plan for that before adding downstream checks, and decide what the flow should do when an approver does not respond.
Account for skipped actions in downstream logic
Actions in an unselected condition branch are skipped. That means a later action should not assume the approval action always ran or returned an outcome.
Initialize a default before the condition, then update it inside the approval branch. Downstream logic can check the tracking value and handle both cases: the approval was required and produced a response, or the approval was not required.
Configure timeouts, reminders, and escalation deliberately
Set a response deadline that fits your organization’s policy. Decide whether a late response should trigger a reminder, an escalation, or a change in request status, and confirm how your flow handles each case.
Check current approval and flow limits before designing long waits. Microsoft notes that an approval flow can wait for 28 days; beyond that, the flow can fail while the approval remains in the action center. See Microsoft’s known issues for Power Automate approvals.
Test every decision path before publishing
Test a request that meets each approval rule, and one that skips it. For every approval, also test approval, rejection, and no response. Confirm the requester receives the right notice and that the request record shows the right status.
Review the flow’s run history after each test. Check that skipped actions are expected, the outcome values are correct, and shared actions run only after the intended branch has finished.
Make the single-flow design easier to maintain
A single flow can be easier to update when all approval steps belong to one process. Readable action names, documented rules, and clear records help keep that design useful as the policy changes.
Name actions and document the business rules
Name each condition and approval for its purpose, not just its action type. Add a brief note explaining the rule, such as “Manager review is required when the request total is above $5,000.”
Keep the flow aligned with the process owner’s current requirements. When a threshold or rule changes, update the documentation and test the affected routes before publishing.
Review approval access and audit needs
Check who can approve each request and what details they receive. Include enough context for a decision while following your organization’s access and data rules. Record decisions and comments where the business process needs an audit trail.
Use current Microsoft Learn guidance for approval actions, conditions, and flow behavior when you change the design. Product settings and limits can change, so verify them rather than relying on an old example.
Know when a separate flow may still be appropriate
One flow fits well when the approval paths share a trigger, owner, and core process. Separate flows may be a better choice when teams have different owners, access needs, triggers, or release schedules.
The goal isn’t to minimize the flow count at any cost. Choose a design your team can govern, test, and maintain.
Keep optional approvals flexible without duplicating the process
Use conditions to decide whether each approval runs, and give both the approval and skip paths an explicit outcome. Then check approval results before deciding what happens next, and test required, skipped, rejected, and unanswered cases.
Start by writing down the business rules with the process owner. Build the smallest clear set of conditions that follows those rules, then check every route in run history before putting the flow into use.