Sample Model Driven APP in Dynamics 365 in Details – Book Store Management
This article explains how to create a Model Driven Power App to manage a Book Store extensively. In my previous article I have explained how to create UCI app you can read here. This article is a continuation part of the last article.
Scenario : We will create a Model-Driven App to Manage a Book Store which involves Customers, Orders, Books, Invoices and Some Dashboard, Views and Forms with Some customized sitemap links. We will also see how to design a welcome page for our app.
For this requirement lets first create a flowchart to understand the working units and its entity relation diagrams.

Lets understand the requirement first in a details analysis as per below points of solution design.
The “Book Store Management” app should have below provisions.
- Books records can be created and managed facility. Users can Add/Edit/Update/Delete Books to the Store.
- User can add customers in the Book Store app or can use existing customers of Dynamics 365 application.
- There should be provisions to create Orders for an customer and adding the requested books to the order as per customer.
- The Bookstore has a percentage discount for each retail book sale its 5% per book. But for wholesale deal like Dozzons of book the Discount will be charged as 10%.
- User should able to fulfil order and create invoices for the sale and able to create Email activity to inform customer about the order status.
Lets start. First open Dynamics 365 Application and Create a new solution called “Book Store Management”. User Power App way of solution editing UI like below.

Click on “Add Existing” button above to select desired entities for our solution.

From the Entity selection screen Choose Contact, Order, Invoice, Product entities one by one. While adding select “Include All Components” option for entities and proceed.

Now Save the solution and Publish. Now Click on Apps link from left side of the above solution screen. now we can see All Apps view. Click on “New App” button and select Model-driven option to create a new App.

This will open the “Create A new App” windows where we have to provide the information like App name, Description. We can also specifie if we want to use an existing solution for our app or not. for this app we will use “Book Store Management” solution so tick the option “Use Existing Solution” checkbox and then click Next.

Now we have to choose the solution we have created from the dropdown. After selction click Done to proceed.

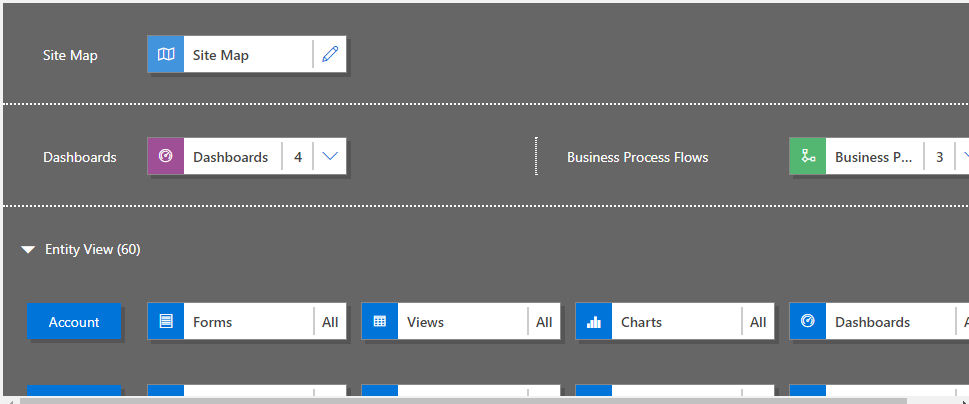
It will open the Model-driven App Designer window with Sitemap, Dashboard, Entity form options to edit as seen in below screenshot.

Now its time to design our app by following the requirement. First of All Design/Edit the Sitemp by clicking the edit icon besides the Sitemap option.

It eill open the SiteMap editor where we can add Areas, Groups, SubAreas for our App Sitemap. Sitemap links are showing in left side of the app as expand/collapsible section. we will see after the app publish.
Rename the “New Area” to “Book Store” by clicking the Edit icon. Also rename the “New Group” to “Book Store Data”. Select the “New SubArea”. Here we can choose the type of the SubArea as “Entity/Dashboard/Web Resource/URL”. For the Subarea in the properties select Type as “Entity” and Entity as “Product”.

Add new 3 SubAreas by clicking Add button as below for Contact, Order and Invoice.

Now click on Save and Close to go back to main App Designer UI. In the main screen you observe for all entities in our solution All components are selected by default such as for contact there are many Forms but we dont want all so we have to unselect which are not needed.
First we will do it for Dashboards. Select the Purple box of Dashboard and in right side Component uncheck the “All” checkbox.

Do it for all Components of entities. and Business process Flow. After doing this click Save. Click on Validate button to check if the app design is all OK. Now Click Publish to make the App Available in Apps List.
You can Play the App from the Designer by clicking Play button otherwise we can run the app by visiting main Dynamics 365 screen and app section.

We have not yet completed the app fully. In above step I just explained how to publish and use the app. Now we will again move back to app designer and make changes.

Now We will create a new view for Product Entity called as “Available Books in Inventory”. Refere previous article for Product Catalog Configuration for Book Store. to do this select the product entity and select View and click on Create New from component window right side.

Add the Filter creteria and Column for the view and click Save and Close.

Now select the view we have just created and click on save and then Publish to check if the app works or not. Now if you go to the app and refresh it you can see the View for Product Entity showing products whose descript is BOOK.

using the Command Bar we can add new Product, delete or update existing products. So our first requirement is completed.
using Contact section we can add/update/delete contacts so our Second requirement is completed.
Using Order section user can create Orders and Add Products as Orderline to the Order. This completes the Ordering the third requirement is completed.
From Order user can create Invoices by clicking “Create invoice” button. The Fourth requirement is also complete as we can create orders and the discount is applied as 5% as the Book price is 400.

So this is how we can create Model-driven apps for Dynamics 365 using Power Apps concept.

Don’t miss the chance to participate in the upcoming Internship Program which will be done using Microsoft Dot Net Web Development Full Stack Technology. The new batch will be starting from May 20, 2024. We will have most experienced trainers for you to successfully complete the internship with live project experience.
Why to choose Our Internship Program?
Industry-Relevant Projects
Tailored Assignments: We offer projects that align with your academic background and career aspirations.
Real-World Challenges: Tackle industry-specific problems and contribute to meaningful projects that make a difference.
Professional Mentorship
Guidance from Experts: Benefit from one-on-one mentorship from seasoned professionals in your field.
Career Development Workshops: Participate in workshops that focus on resume building, interview skills, and career planning.
Networking Opportunities
Connect with Industry Leaders: Build relationships with professionals and expand your professional network.
Peer Interaction: Collaborate with fellow interns and exchange ideas, fostering a supportive and collaborative environment.
Skill Enhancement
Hands-On Experience: Gain practical skills and learn new technologies through project-based learning.
Soft Skills Development: Enhance communication, teamwork, and problem-solving skills essential for career success.
Free Demo Class Available


