How to call Power Automate (Flow) from Power Portal using HTTP Request Trigger
Power Portal is very popular and robust Power Apps in Microsoft Power Platform designed for public facing websites. Microsoft already stacked excellent features like Table List, Basic Forms, Table Permissions, Web Roles to seamlessly manage power portal.
But sometimes it requires to have more complex integration business scenarios that cannot be achieved using out-of-the-box configuration features. So We need to have some integration using Power Automate.
We can leverage Power Automate to be integrated with Power Portal using HTTP request Triggers. We can pass a JSON object as a HTTP request to Power Automate Flow and we can add our required actions in Flow. Lets see a business requirement.
Business Requirement
I want to show account records from Microsoft DataVerse on Power Portal. and user can edit account records from Portal then on clicking update button it will call a Power Automate to do this update.
lets us see step by step to do this.
Step1- Create a Microsoft Power Automate to use HTTP Trigger and Update Action
Open Power Automate and Choose correct environment then create a cloud flow, give a name as of your choice and choose the trigger HTTP and select When a HTTP Request received.

Once you select this trigger you have to provide the JSON schema. For our example the below is the JSON schema.
{
"account" :
     [
        { "accountid": "33e86bd1-e704-ea11-a811-000d3af962ef", "name": "Softchief Account"}
     ]
}
in Power Automate from Request Trigger choose “use sample payload to generate schema” and put the above JSON payload and click DONE.

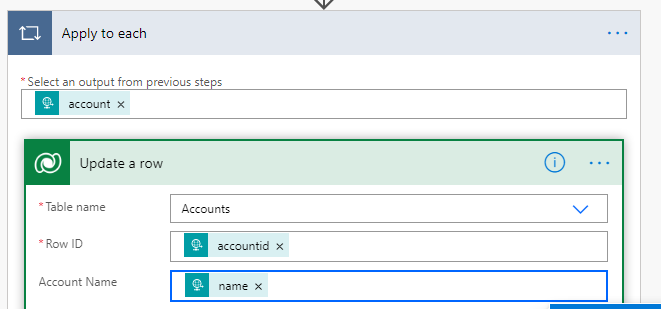
Next add another action update row and select table as Accounts with DataVerse Connector. Select RowID field and from Dynamics field list select accountid. It will automatically add Apply for each loop for the update action.

Now inside the for each loop the update operation will execute as the JSON may contain multiple accounts for update.

now choose Account Name as name from JSON step using Dynamic content.

Now we are done. Once you save the flow you can see the URL for communication.

Copy the URL from the HTTP POST URL which will be used in Portal.
my URL generated is :
https://prod-75.westus.logic.azure.com:443/workflows/79471c8782f44b118f0a26b568cac66d/triggers/manual/paths/invoke?api-version=2016-06-01&sp=%2Ftriggers%2Fmanual%2Frun&sv=1.0&sig=3qtGM06IIxNs9ES289Qbr0jn1qbVI18Bb8hq8A8spJ0
Now we will update Portal Code and Web Template
Step 2 : Update Portal Web Template to call Flow
Open Power Portal management app and create a web template and below code and use the web template is a page Template with a Web page association.
{% fetchxml acc %}
<fetch version="1.0" output-format="xml-platform" mapping="logical" distinct='true' returntotalrecordcount='true'>
    <entity name="account" >
        <attribute name="name" />
        <attribute name="accountid" />
        <attribute name="primarycontactid" />
    </entity>
</fetch>
{% endfetchxml %}

{% if acc.results.total_record_count > 0 %}
<div style="width:100%;align:center">
  <table class="styled-table"  >
    {% for ac in acc.results.entities %}
      <tr>
        <td><input type="text" id="{{ac.accountid}}" value="{{ac.name}}" /></td>
        <td><input type="text" id="ACCID{{ac.accountid}}" value="{{ac.accountid}}" /></td>
        <td><input type="text" id="CUSTID{{ac.primarycontactid}}" value="{{ac.primarycontactid.name}}" /></td>
        <td><button onclick="updaterecord('{{ac.accountid}}')">Update</button></td>
     </tr>
    {% endfor %}
   </table>
{% else %}
    <h2>No records found.</h2>
{% endif %}
</div>
<script>
function updaterecord(id) {
        var acupdate = '{ "account" : [' +
        '{ "accountid": "' + id +'", "name": "' + document.getElementById(id).value.trim() + '"} ]}';
        var req = new XMLHttpRequest();
        var url = "https://prod-75.westus.logic.azure.com:443/workflows/79471c8782f44b118f0a26b568cac66d/triggers/manual/paths/invoke?api-version=2016-06-01&sp=%2Ftriggers%2Fmanual%2Frun&sv=1.0&sig=3qtGM06IIxNs9ES289Qbr0jn1qbVI18Bb8hq8A8spJ0";
        req.open("POST", url, true);
        req.setRequestHeader('Content-Type', 'application/json');
        req.send(acupdate);
        alert("updated");
    }
</script>
The above code displays all accounts from Dataverse on portal page as I have used fetchXML to read accounts. Once the fetchXML retrieves record I am displaying record in a table using liquid for loop.
on every row I added a button and on button click I called a method updaterecord and passing the account id as parameter.
The javascript calls the Power Automate by sending a POST HTTP request to our URL generated in Flow.
function updaterecord(id) {
        var acupdate = '{ "account" : [' +
        '{ "accountid": "' + id +'", "name": "' + document.getElementById(id).value.trim() + '"} ]}';
        var req = new XMLHttpRequest();
        var url = "https://prod-75.westus.logic.azure.com:443/workflows/79471c8782f44b118f0a26b568cac66d/triggers/manual/paths/invoke?api-version=2016-06-01&sp=%2Ftriggers%2Fmanual%2Frun&sv=1.0&sig=3qtGM06IIxNs9ES289Qbr0jn1qbVI18Bb8hq8A8spJ0";
        req.open("POST", url, true);
        req.setRequestHeader('Content-Type', 'application/json');
        req.send(acupdate);
        alert("updated");
    }
The page will look like below.

Now when you change the account name and click update of the specific row the account gest updated in DataVerse.
I hope this helps.
Important Note : If Web Role, Table Permission is not configured then configure for the logged in user.
Hope this helps

Don’t miss the chance to participate in the upcoming Internship Program which will be done using Microsoft Dot Net Web Development Full Stack Technology. The new batch will be starting from May 20, 2024. We will have most experienced trainers for you to successfully complete the internship with live project experience.
Why to choose Our Internship Program?
Industry-Relevant Projects
Tailored Assignments: We offer projects that align with your academic background and career aspirations.
Real-World Challenges: Tackle industry-specific problems and contribute to meaningful projects that make a difference.
Professional Mentorship
Guidance from Experts: Benefit from one-on-one mentorship from seasoned professionals in your field.
Career Development Workshops: Participate in workshops that focus on resume building, interview skills, and career planning.
Networking Opportunities
Connect with Industry Leaders: Build relationships with professionals and expand your professional network.
Peer Interaction: Collaborate with fellow interns and exchange ideas, fostering a supportive and collaborative environment.
Skill Enhancement
Hands-On Experience: Gain practical skills and learn new technologies through project-based learning.
Soft Skills Development: Enhance communication, teamwork, and problem-solving skills essential for career success.
Free Demo Class Available


