Add new fields on registration page or Edit Registration Page in Power portal
Follow my blog for more trending topics on Dynamics 365, Azure, C#, Power Portals and Power Platform. For training, Courses and consulting, call to us at +91 832 886 5778 I am working more for community to share skills in Dynamics 365 and Power Platform. Please support me by subscribing my YouTube Channel. My YouTube Channel link is this : https://www.youtube.com/user/sppmaestro
In this post we will see how you can edit or add new fields to registration page and update data in Dynamics 365. As because there is no easy way to do this, so this article will help you to do the changes. Lets start,
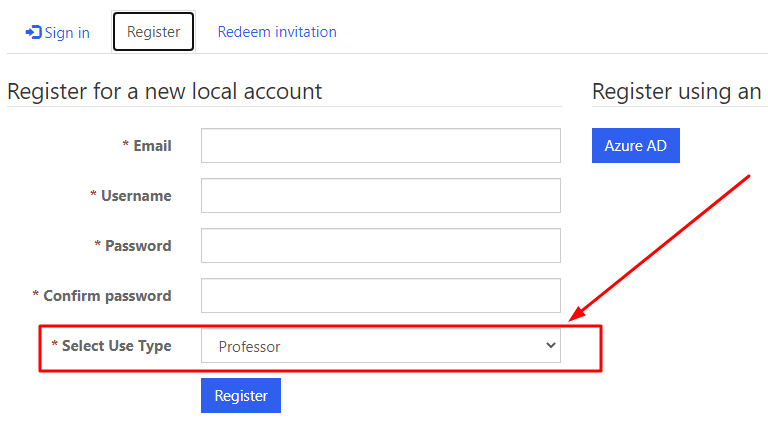
The requirement is I want to Add a new Choice field on Registration page and while registering the user should select the value of User Type and after registration the value of the User type value will be updated.
We are going to achieve below changes you can see in the screenshot below:

Step:1 : Configure Content Snippet for Adding new field in Registration Page
Login Power Apps and open Portal Management Model driven app. Navigate to Content snippet and create a new content snippet as below.
Name : Account/Register/PageCopy and Type : HTML, Display Name : Account/Register/PageCopy

Write down the below code in HTML section of the content snippet. In the below screen we are inserting a select control with some options after two steps of User Name field of Registration page using jQuery after method. Then we are inserting a custom button after existing register button using same technique and also hiding the existing button.
Then we are storing the selected value of Select control using localStorage and calling original Register button click event inside the custom button.
NOTE : Make sure to use return false as last line inside custom button click event otherwise it will not work.

<script>
$(document).ready(function() {
        // Code to add custom select
        $('#ContentContainer_MainContent_MainContent_ShowUserName').next().next().after('<div class="form-group"><label class="col-sm-4 control-label required"><span id="ContentContainer_MainContent_MainContent_utype"><span class="xrm-editable-text xrm-attribute"><span class="xrm-attribute-value">Select Use Type</span></span></span></label><div class="col-sm-8"><select name="utype" id="utypefield" class="form-control" aria-required="true"><option value="Professor">Professor</option><option value="Student">Student</option><option value="AdminStaff">Admin Staff</option><option value="LabStaff">Staff Lab</option></select></div></div>');

        //Code to Add Custom 'Register' Button
        $('#SubmitButton').after('<input type="submit" name="ctl00$ctl00$ContentContainer$MainContent$MainContent$mySubmitButton"  value="Register" id="mySubmitButton" class="btn btn-primary">');
//Hide the original
 $('#SubmitButton').hide();

        $("#mySubmitButton").click(function()
        {
            var uTypeVal = document.getElementById("utypefield").value;
            localStorage.setItem("utype", uTypeVal);
            $('#SubmitButton').click();
            return false;
       });
});
</script>
Now you can clear the cache and test the registration page your new field will display on the page. Like wise you can add any HTML control on the page.
To identify the actual IDs of different sections or control you can use Inspect option on your browser page.
Step:2 – Edit Profile Web Page to add the new field on Profile Web Form
As because we have stored the new field value in localStorage we have to display the value in a control on Profile page so that the value can be posted back to the server when profile page update button is clicked.
Now update the “Profile Web Form” of the contact entity. This form is used in profile web page of power portal. Go to Dataverse and add the new field on the form. if the field is not available in contact entity create new field and add in form.

Add the field on to the form.

Once this step is done add some script on the profile page content page in power portal. navigate to Portal Management model driven app and go to Web pages, search for profile, open the profile page and click on Localized content page and inside the HTML section add the below code.
in the below code we are reading the localStorage value and checking the value using if condition and assigning the correction choice field value to the select field on the form and clear the localStorage.

<script>
//profile page
$(document).ready(function() {
    var utypeselected= localStorage.getItem("utype");
    if(utypeselected != null || utypeselected != "")
    {
    if(utypeselected =="Professor")
    {
      document.getElementById("edu_usertype").value = 100000000;
    }
    else if(utypeselected =="Student")
    {
      document.getElementById("edu_usertype").value = 100000001;
    }
    else if(utypeselected =="Admin Staff")
    {
      document.getElementById("edu_usertype").value = 100000002;
    }
    else if(utypeselected =="Lab Staff")
    {
      document.getElementById("edu_usertype").value = 100000003;
    }

     localStorage.clear();
}
});
</script>
Now save and clear cache to test. Open Portal click on Registration and you can see new field, provide all required info with new field info and click register. now the system will redirect to profile page and the new field value will automatically populated in the control on the profile page. When user saves profile page the data will be saved with the new field value in database in contact record.
Now its done. We have successfully added new field in registration page and saved in table.
Follow my blog for more trending topics on Dynamics 365, Azure, C#, Power Portals and Power Platform. For training, Courses and consulting, call to us at +91 832 886 5778 I am working more for community to share skills in Dynamics 365 and Power Platform. Please support me by subscribing my YouTube Channel. My YouTube Channel link is this : https://www.youtube.com/user/sppmaestro

Don’t miss the chance to participate in the upcoming Internship Program which will be done using Microsoft Dot Net Web Development Full Stack Technology. The new batch will be starting from May 20, 2024. We will have most experienced trainers for you to successfully complete the internship with live project experience.
Why to choose Our Internship Program?
Industry-Relevant Projects
Tailored Assignments: We offer projects that align with your academic background and career aspirations.
Real-World Challenges: Tackle industry-specific problems and contribute to meaningful projects that make a difference.
Professional Mentorship
Guidance from Experts: Benefit from one-on-one mentorship from seasoned professionals in your field.
Career Development Workshops: Participate in workshops that focus on resume building, interview skills, and career planning.
Networking Opportunities
Connect with Industry Leaders: Build relationships with professionals and expand your professional network.
Peer Interaction: Collaborate with fellow interns and exchange ideas, fostering a supportive and collaborative environment.
Skill Enhancement
Hands-On Experience: Gain practical skills and learn new technologies through project-based learning.
Soft Skills Development: Enhance communication, teamwork, and problem-solving skills essential for career success.
Free Demo Class Available


