Create your first PCF custom control step-by-step and deploy in Power Apps
Follow below steps to create your first PCF control for Power Apps.
Step 1 – Install Node JS
First you have to install node.js using official website of Node JS. Follow the link https://nodejs.org/en/download/current/ to navigate to Node JS site. Click on Windows Installer to download the setup file. chose a folder to save the MSI file and install the MSI file in your machine.

Once installed verify by typing the script node -v in command prompt. To open command prompt type window key + R. it will open run command. Type cmd and hit enter. it will open black screen command prompt. Type node -v and hit enter, you will see the node version.


Step 2 – Install Power Apps CLI
Navigate to https://aka.ms/PowerAppsCLI and download Power Apps CLI. Install it after download.

Verify by typing pac install latest command in command prompt.

Step 3 – Install Visual Studio Code
Download Free Visual Studio code and install from this URL https://code.visualstudio.com/download

Step 4 – Create a PCF project folder
Create a folder in your local drive. Lets create a folder named as “FirstPCF” in C:/ Drive.

open command prompt and change your current directory to FirstPCF folder by using cd/ and then cd firstpcf

now your command prompt pointing to FirstPCF folder. type code and hit enter. It will open the folder in visual studio code.

Now you are in Visual Studio Code. In Visual Studio code click on File and Open Folder. Point to FirstPCF folder and click Open.

Your VS Code is now pointing to the same directory.

Open a new Terminal in VS Code by using terminal menu and new terminal option.

The PowerShell Terminal will open. Change the terminal to Command Prompt Terminal by using + icon.

Now you will see the final terminal here in below screenshot.

Enter the below command to initialize a PCF project and hit enter inside terminal.
pac pcf init –namespace softchiefNS –name softchiefPCF –template field

now type npm install command and hit enter.

It will now install all required dependencies into your project.
Now the PCF project base is ready.
Step 5 – Develop your first control
Install Power Platform tools inside VS Code.

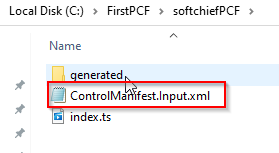
Inside FirstPCF folder you will find all files installed.
check the directory first. you will see these files inside.

Open the ControlManifest.Input.xml file created inside the folder created with the control’s name. The control manifest is an XML file that contains the metadata of the code component. It also defines the behavior of the code component. When you open the ControlManifest.Input.xml file in Visual Studio Code, you’ll notice that the manifest file is predefined with some properties.

<?xml version="1.0" encoding="utf-8" ?>
<manifest>
  <control namespace="softchiefNS" constructor="softchiefPCF" version="0.0.1" display-name-key="softchiefPCF" description-key="softchiefPCF description" control-type="standard" >
    <!--external-service-usage node declares whether this 3rd party PCF control is using external service or not, if yes, this control will be considered as premium and please also add the external domain it is using.
    If it is not using any external service, please set the enabled="false" and DO NOT add any domain below. The "enabled" will be false by default.
    Example1:
      <external-service-usage enabled="true">
        <domain>www.Microsoft.com</domain>
      </external-service-usage>
    Example2:
      <external-service-usage enabled="false">
      </external-service-usage>
    -->
    <external-service-usage enabled="false">
      <!--UNCOMMENT TO ADD EXTERNAL DOMAINS
      <domain></domain>
      <domain></domain>
      -->
    </external-service-usage>
    <!-- property node identifies a specific, configurable piece of data that the control expects from CDS -->
    <property name="sampleProperty" display-name-key="Property_Display_Key" description-key="Property_Desc_Key" of-type="SingleLine.Text" usage="bound" required="true" />
    <!--
      Property node's of-type attribute can be of-type-group attribute.
      Example:
      <type-group name="numbers">
        <type>Whole.None</type>
        <type>Currency</type>
        <type>FP</type>
        <type>Decimal</type>
      </type-group>
      <property name="sampleProperty" display-name-key="Property_Display_Key" description-key="Property_Desc_Key" of-type-group="numbers" usage="bound" required="true" />
    -->
    <resources>
      <code path="index.ts" order="1"/>
      <!-- UNCOMMENT TO ADD MORE RESOURCES
      <css path="css/softchiefPCF.css" order="1" />
      <resx path="strings/softchiefPCF.1033.resx" version="1.0.0" />
      -->
    </resources>
    <!-- UNCOMMENT TO ENABLE THE SPECIFIED API
    <feature-usage>
      <uses-feature name="Device.captureAudio" required="true" />
      <uses-feature name="Device.captureImage" required="true" />
      <uses-feature name="Device.captureVideo" required="true" />
      <uses-feature name="Device.getBarcodeValue" required="true" />
      <uses-feature name="Device.getCurrentPosition" required="true" />
      <uses-feature name="Device.pickFile" required="true" />
      <uses-feature name="Utility" required="true" />
      <uses-feature name="WebAPI" required="true" />
    </feature-usage>
    -->
  </control>
</manifest>
The control node defines the namespace, version, and display name of the code component. property node identifies a specific, configurable piece of data that the control expects from CDS.
You can change name, description and of-type, usage and required field. Usage has two property bound and input. Bound properties are bound only to the value of the column. Input properties are either bound to a column or allow a static value. Read more type groups here.
<property name="sampleProperty" display-name-key="Property_Display_Key" description-key="Property_Desc_Key" of-type="SingleLine.Text" usage="bound" required="true" />You can call CSS, TypeScript resource node. Update manifest file as below. control type-of-group added.
<?xml version="1.0" encoding="utf-8" ?>
<manifest>
  <control namespace="softchiefNS" constructor="softchiefPCF" version="0.0.1" display-name-key="softchiefPCF" description-key="softchiefPCF description" control-type="standard" >
    <type-group name="numbers">
        <type>Whole.None</type>
        <type>Currency</type>
        <type>FP</type>
        <type>Decimal</type>
      </type-group>
    <property name="sampleProperty" display-name-key="Property_Display_Key" description-key="Property_Desc_Key" of-type-group="numbers" usage="bound" required="true" />

    <resources>
      <code path="index.ts" order="1"/>
      <css path="css/softchiefPCF.css" order="1" />
    </resources>
  </control>
</manifest>
open index.ts file inside visual studio.
download a sample PDF to go step by step here .
https://bgx.blob.core.windows.net/files/powerplatform/PCFControlGuide.pdf
Follow Microsoft Site to build a Sample PCF
Hope this helps.
Follow my blog for more trending topics on Dynamics 365, Azure, C#, Power Portals and Power Platform. For training, Courses and consulting, call to us at +91 832 886 5778 I am working more for community to share skills in Dynamics 365 and Power Platform. Please support me by subscribing my YouTube Channel. My YouTube Channel link is this : https://www.youtube.com/user/sppmaestro

Don’t miss the chance to participate in the upcoming Internship Program which will be done using Microsoft Dot Net Web Development Full Stack Technology. The new batch will be starting from May 20, 2024. We will have most experienced trainers for you to successfully complete the internship with live project experience.
Why to choose Our Internship Program?
Industry-Relevant Projects
Tailored Assignments: We offer projects that align with your academic background and career aspirations.
Real-World Challenges: Tackle industry-specific problems and contribute to meaningful projects that make a difference.
Professional Mentorship
Guidance from Experts: Benefit from one-on-one mentorship from seasoned professionals in your field.
Career Development Workshops: Participate in workshops that focus on resume building, interview skills, and career planning.
Networking Opportunities
Connect with Industry Leaders: Build relationships with professionals and expand your professional network.
Peer Interaction: Collaborate with fellow interns and exchange ideas, fostering a supportive and collaborative environment.
Skill Enhancement
Hands-On Experience: Gain practical skills and learn new technologies through project-based learning.
Soft Skills Development: Enhance communication, teamwork, and problem-solving skills essential for career success.
Free Demo Class Available


