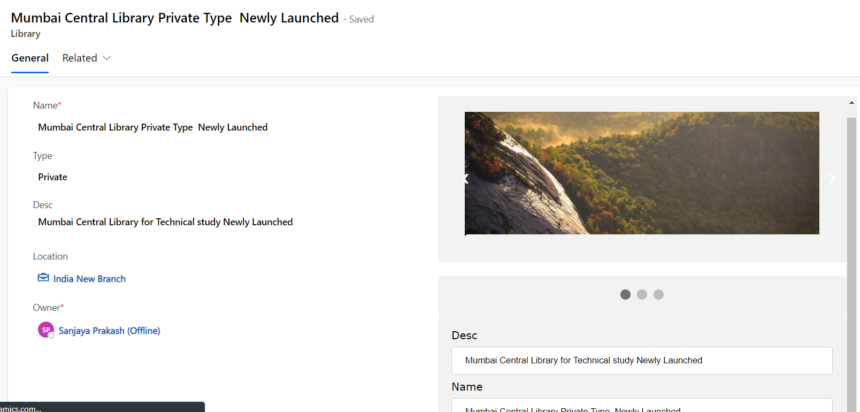
Pass Form Context from Form to HTML web resource ;in model driven power apps dataverse

Follow below steps.
step 1 – Pass context from Form to Web Resource using Form on load
on Form on load call the below method. make sure to use correct web resource name.

// This should be in a script loaded on the form.
// form_onload is a handler for the form onload event.
function form_onload(executionContext) {
    var formContext = executionContext.getFormContext();
    var wrControl = formContext.getControl("WebResource_new_1");
    if (wrControl) {
        wrControl.getContentWindow().then(
            function (contentWindow) {
                contentWindow.setClientApiContext(Xrm, formContext);
            }
        )
    }
}
Step 2 – Edit HTML Web resource to read the form context
you can now use script to read context and declare global variables to use.
use below code in HTML web resource.
<!DOCTYPE html>
<html>
<head>
<meta name="viewport" content="width=device-width, initial-scale=1">
<style>
* {box-sizing: border-box}
body {font-family: Verdana, sans-serif; margin:0}
.mySlides {display: none}
img {vertical-align: middle;}

/* Slideshow container */
.slideshow-container {
  max-width: 1000px;
  position: relative;
  margin: auto;
}

/* Next & previous buttons */
.prev, .next {
  cursor: pointer;
  position: absolute;
  top: 50%;
  width: auto;
  padding: 16px;
  margin-top: -22px;
  color: white;
  font-weight: bold;
  font-size: 18px;
  transition: 0.6s ease;
  border-radius: 0 3px 3px 0;
  user-select: none;
}

/* Position the "next button" to the right */
.next {
  right: 0;
  border-radius: 3px 0 0 3px;
}

/* On hover, add a black background color with a little bit see-through */
.prev:hover, .next:hover {
  background-color: rgba(0,0,0,0.8);
}

/* Caption text */
.text {
  color: #f2f2f2;
  font-size: 15px;
  padding: 8px 12px;
  position: absolute;
  bottom: 8px;
  width: 100%;
  text-align: center;
}

/* Number text (1/3 etc) */
.numbertext {
  color: #f2f2f2;
  font-size: 12px;
  padding: 8px 12px;
  position: absolute;
  top: 0;
}

/* The dots/bullets/indicators */
.dot {
  cursor: pointer;
  height: 15px;
  width: 15px;
  margin: 0 2px;
  background-color: #bbb;
  border-radius: 50%;
  display: inline-block;
  transition: background-color 0.6s ease;
}

.active, .dot:hover {
  background-color: #717171;
}

/* Fading animation */
.fade {
  animation-name: fade;
  animation-duration: 1.5s;
}

@keyframes fade {
  from {opacity: .4}
  to {opacity: 1}
}

/* On smaller screens, decrease text size */
@media only screen and (max-width: 300px) {
  .prev, .next,.text {font-size: 11px}
}

input[type=text], select {
  width: 100%;
  padding: 12px 20px;
  margin: 8px 0;
  display: inline-block;
  border: 1px solid #ccc;
  border-radius: 4px;
  box-sizing: border-box;
}

input[type=submit] {
  width: 100%;
  background-color: #4CAF50;
  color: white;
  padding: 14px 20px;
  margin: 8px 0;
  border: none;
  border-radius: 4px;
  cursor: pointer;
}

input[type=submit]:hover {
  background-color: #45a049;
}

div {
  border-radius: 5px;
  background-color: #f2f2f2;
  padding: 20px;
}

</style>
</head>
<body>

<div class="slideshow-container">

<div class="mySlides fade">
  <div class="numbertext">1 / 3</div>
  <img src="https://www.w3schools.com/howto/img_nature_wide.jpg" style="width:100%">
  <div class="text">Caption Text</div>
</div>

<div class="mySlides fade">
  <div class="numbertext">2 / 3</div>
  <img src="https://www.w3schools.com/howto/img_snow_wide.jpg" style="width:100%">
  <div class="text">Caption Two</div>
</div>

<div class="mySlides fade">
  <div class="numbertext">3 / 3</div>
  <img src="https://www.w3schools.com/howto/img_mountains_wide.jpg" style="width:100%">
  <div class="text">Caption Three</div>
</div>

<a class="prev" onclick="plusSlides(-1)">❮</a>
<a class="next" onclick="plusSlides(1)">❯</a>

</div>
<br>

<div style="text-align:center">
  <span class="dot" onclick="currentSlide(1)"></span>
  <span class="dot" onclick="currentSlide(2)"></span>
  <span class="dot" onclick="currentSlide(3)"></span>
</div>

<script>
let slideIndex = 1;
showSlides(slideIndex);

function plusSlides(n) {
  showSlides(slideIndex += n);
}

function currentSlide(n) {
  showSlides(slideIndex = n);
}

function showSlides(n) {
  let i;
  let slides = document.getElementsByClassName("mySlides");
  let dots = document.getElementsByClassName("dot");
  if (n > slides.length) {slideIndex = 1}
  if (n < 1) {slideIndex = slides.length}
  for (i = 0; i < slides.length; i++) {
    slides[i].style.display = "none";
  }
  for (i = 0; i < dots.length; i++) {
    dots[i].className = dots[i].className.replace(" active", "");
  }
  slides[slideIndex-1].style.display = "block";
  dots[slideIndex-1].className += " active";
}


function setClientApiContext(xrm, formContext) {
		// Optionally set Xrm and formContext as global variables on the page.
		window.Xrm = xrm;
		window._formContext = formContext;
        var ltype = formContext.getAttribute("fbs_type").getValue();
		// Add script logic here that uses xrm or the formContext.
		if(ltype==793990003)//private
                       {
			document.getElementById("desc").value = formContext.getAttribute("fbs_desc").getValue();
                      document.getElementById("name").value = formContext.getAttribute("fbs_name").getValue();
                      }
		else
                    {
			document.getElementById("desc").value="";
 			document.getElementById("name").value="";
                    }

	}

function updateFormData() {
		// use global variable
		window._formContext.getAttribute("fbs_name").setValue(document.getElementById("name").value);
                 window._formContext.getAttribute("fbs_desc").setValue(document.getElementById("desc").value);
                 window._formContext.data.entity.save("save");


	}

</script>
<div>
    <label for="desc">Desc</label>
    <input type="text" id="desc" name="desc">

     <label for="name">Name</label>
    <input type="text" id="name" name="name">
<button onclick="updateFormData()">Submit</button>


</div>
</body>
</html>
Hope this helps.
Don’t miss the chance to participate in the upcoming Internship Program which will be done using Microsoft Dot Net Web Development Full Stack Technology. The new batch will be starting from May 20, 2024. We will have most experienced trainers for you to successfully complete the internship with live project experience.
Why to choose Our Internship Program?
Industry-Relevant Projects
Tailored Assignments: We offer projects that align with your academic background and career aspirations.
Real-World Challenges: Tackle industry-specific problems and contribute to meaningful projects that make a difference.
Professional Mentorship
Guidance from Experts: Benefit from one-on-one mentorship from seasoned professionals in your field.
Career Development Workshops: Participate in workshops that focus on resume building, interview skills, and career planning.
Networking Opportunities
Connect with Industry Leaders: Build relationships with professionals and expand your professional network.
Peer Interaction: Collaborate with fellow interns and exchange ideas, fostering a supportive and collaborative environment.
Skill Enhancement
Hands-On Experience: Gain practical skills and learn new technologies through project-based learning.
Soft Skills Development: Enhance communication, teamwork, and problem-solving skills essential for career success.
Free Demo Class Available


