How to add a configuration page for your Power Apps Solution

You can upload a configuration file to note all required configurations for your solution. Follow below steps to do this.
Step 1 – Create a HTML Web Resource
Open your power apps solution and add a new web resource component of Type HTML. Before it prepare a HTML Page and mention detailed Explanation about your configuration. A sample HTML page given below.
<!DOCTYPE html>
<html lang="en">

<head>
    <meta charset="UTF-8">
    <meta name="viewport" content="width=device-width, initial-scale=1.0">
    <title>Software Configuration Manual</title>
    <style>
        body {
            font-family: Arial, sans-serif;
            margin: 20px;
        }

        h1 {
            color: #333;
        }

        h2 {
            color: #555;
        }

        p {
            color: #777;
        }

        code {
            font-family: 'Courier New', monospace;
            background-color: #f4f4f4;
            padding: 2px 4px;
            border: 1px solid #ddd;
        }
    </style>
</head>

<body>

    <header>
        <h1>Software Configuration Manual</h1>
    </header>

    <section>
        <h2>Introduction</h2>
        <p>
            Welcome to the software configuration manual for [Your Software Name]. This guide provides step-by-step instructions on configuring and setting up the software on your system.
        </p>
    </section>

    <section>
        <h2>System Requirements</h2>
        <p>
            Before you begin the installation and configuration process, ensure that your system meets the following requirements:
        </p>
        <ul>
            <li>Operating System: [Supported OS]</li>
            <li>Processor: [Minimum Processor Requirement]</li>
            <li>Memory: [Minimum RAM Requirement]</li>
            <li>Storage: [Minimum Disk Space Requirement]</li>
        </ul>
    </section>

    <section>
        <h2>Installation</h2>
        <ol>
            <li>Download the latest version of [Your Software Name] from the official website.</li>
            <li>Run the installer and follow the on-screen instructions.</li>
            <li>During the installation, you may be prompted to configure certain settings. Ensure that you provide the required information.</li>
            <li>Once the installation is complete, [additional steps if any].</li>
        </ol>
    </section>

    <section>
        <h2>Configuration</h2>
        <p>
            Follow the steps below to configure [Your Software Name] after installation:
        </p>
        <ol>
            <li>Open the [Your Software Name] application.</li>
            <li>Navigate to the settings or configuration menu.</li>
            <li>Modify the necessary configurations, such as [specific configurations].</li>
            <li>Save your changes.</li>
        </ol>
    </section>

    <footer>
        <p>
            For additional support or troubleshooting, refer to the [Your Software Name] support documentation or contact our support team at support@[yourcompany].com.
        </p>
    </footer>

</body>

</html>
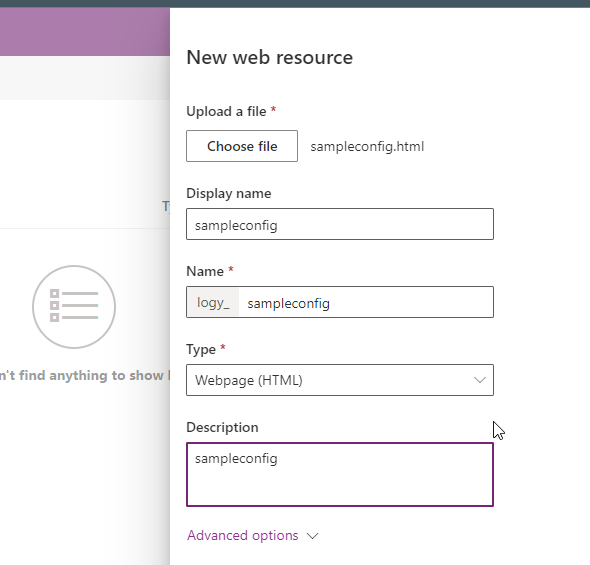
Save the Web Resource and Publish It.
Step 2 – Associate HTML Web Resource with Solution
Now In the solution, naviagate to Overview option and Edit details. Click More Options and select the HTML web resource from the dropdown.
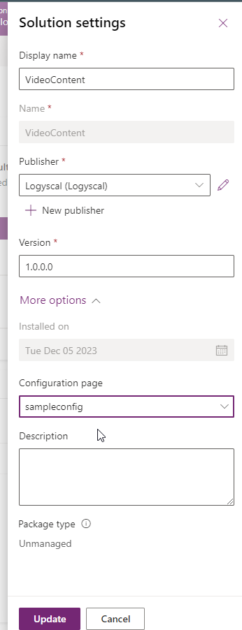
Now click Update.
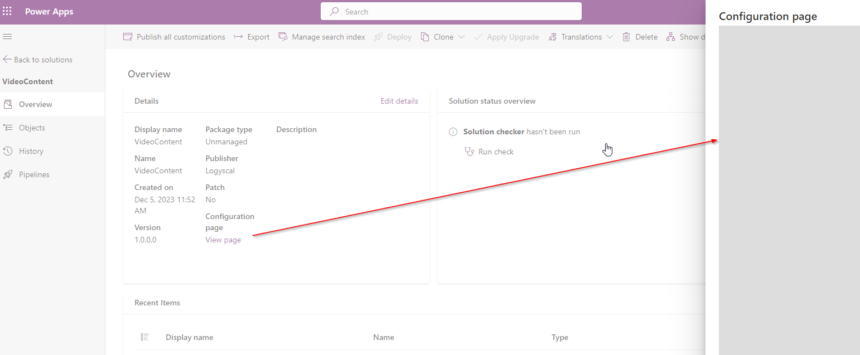
Thats All. You can see the configuration page now for the solution.
hope this helps.

Don’t miss the chance to participate in the upcoming Internship Program which will be done using Microsoft Dot Net Web Development Full Stack Technology. The new batch will be starting from May 20, 2024. We will have most experienced trainers for you to successfully complete the internship with live project experience.
Why to choose Our Internship Program?
Industry-Relevant Projects
Tailored Assignments: We offer projects that align with your academic background and career aspirations.
Real-World Challenges: Tackle industry-specific problems and contribute to meaningful projects that make a difference.
Professional Mentorship
Guidance from Experts: Benefit from one-on-one mentorship from seasoned professionals in your field.
Career Development Workshops: Participate in workshops that focus on resume building, interview skills, and career planning.
Networking Opportunities
Connect with Industry Leaders: Build relationships with professionals and expand your professional network.
Peer Interaction: Collaborate with fellow interns and exchange ideas, fostering a supportive and collaborative environment.
Skill Enhancement
Hands-On Experience: Gain practical skills and learn new technologies through project-based learning.
Soft Skills Development: Enhance communication, teamwork, and problem-solving skills essential for career success.
Free Demo Class Available


