Create a Sample Canvas App using Gallery, Form in Dynamics 365 instance data
Power Platform is the Game changer in these days. Power Apps such as Model-driven apps and Canvas apps crossed all app development limits.
So more learning on these Power Apps more will be your grip towards the Dynamics World. This post is not a new post but to refresh the practical concept of Canvas app design.
I will discuss how to design a Canvas App from scratch and use Dynamics 365 Data source and use User Interfaces such as Gallery, Form and Cards with modern controls.
First thing first. Open the Power App Portal. https://make.powerapps.com/. The portal will show which instance/environment you want to develop the app for. Select the Dynamics 365 CE Instance.
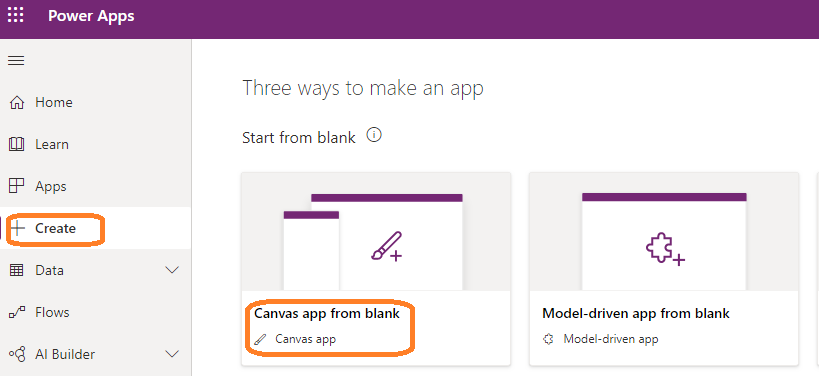
Step-1 : Create Canvas App using Blank Option
In the Home page of the Power App portal select the link “+ Create” which will show three options. Select “Canvas app from blank“.

On clicking this It will open up a Pop-up and in there provide the App Name as “Lead Hunt” and Select device Format for “Mobile”, then click on “Create”.

As soon as you click Create button the Power App Studio editor will open up where all App editings are done. on the Welcome screen click on Skip so that it will take us directly to editing components window.

Canvas apps are actually focused to Build Mobile Apps or Tablet Apps. So we have to understand the requirement correctly while designing Canvas Apps. For Web Apps we can select Model-driven apps which more of data driven apps with limitation User interface element as compared to Canvas apps.
2. Connect Data Source with Canvas App
As we have designed the app from blank template so we have to choose a Data Source on which the app will work. Otherwise we could have taken an template with data source in begining .
So for this Data Source connection click on the Data Source icon from left panel and select the entity. Click on the Connectors below the Data Source panel. Select Dynamics 365 as Connector.

On selection of Dynamics 365 Data Source, all the entities of the instance will be displayed on the right hand side panel and promt you to choose the Table. Search your entity and click on Connect. For our case its Lead.

Now on selection the Lead Table will be added in the list of Data Source.

3. Add a Label to Show header Text and a Gallery to show Leads record on the APP
Now we will add a Text Label from Insert Option from left panel. Drag and Drop the Text Label on the Canvas screen and adjust the position. Also in the Porpoerties window right side update the Text as “Leads Gallery”.

Now Save the App. it is best practice to Save the App after you do some progress on the App design. After Saving the App click on Back Arrow button to go back to App Designer screen.
Now Drag and Drop a Gallery component from left panel to the Canvas screen and place below the Header text label.

Associate the Lead Data Source with the Gallery Component from right side suggestion fly out window and adjust the height of the Gallery to cover the bottom edge of the screen by using the property window or dragging the anchor.
Once the Data Source is associated the Screen with Gallary canvas will look like the below. But we can not see the real values fields of Leads. We can see ony Default values. We need to do some changes to Gallery property for this.

Select the Gallery and go to Property window. Select the Layout dropdown.

From the list select Titles and Subtitles option.

Then click on the Edit option from the Fields section from the properties window.

Here we can change what we need to show for Title option and Subtitle option. Select Title as Name and Subtitle as Topic.

Now after the Topic and Name associated the Canvas App will look like the below with some valid data points.

When you run the App you can see the lead Gallery and you can scroll the gallery down for more records but you can find an arrow button which on click do nothing. Now we will associate a Form to display on clicking of the arrow button.
4. Add New Display Form to Show Details
Now we have to add a display form to display Lead details on a form on clicking of right arrow button of the Gallary list item.
Click on the New Screen option.

Select Blank option from the list to select.

Now we have to associate the Data Source for the Form screen added. Select Datasource as Lead from the Property window for the Form screen.
Now Add a Display Form from insert panel.

5. Associate Display Form link with the arrow link of the Gallery and pass selected Item object from first screen to second screen
Now we will link the Form with the Lead items arrow button from the Gallery. For this click on the arrow button of the first item and click on Action menu and click on Navigate then choose Screen2 and transition as Fade.
Use the formula below for the Navigation link. The third parameter with name “selectedLead” is to be sent to second screen.
Navigate(Screen2, ScreenTransition.Fade,{selectedLead:Gallery1.Selected})

Now In the scond screen select the Display Form and mention the Data Source as “Leads” and add required fields on the form using Edit Fields from the property panel.

Now select the item property of the Display Form and mention the formula as below.

selectedLead // This is the Argument passed from Screen 1
Now Save the App and Run to test. Now you can see when you click on the Item arrow it opens display view with details. Now we can add back button on the second screen to come back to gallery.
For this on second screen add a button with text as “>” and mention the formula for Action to Navigate to Screen 1.
The the Whole screen looks like as below.

Thanks for reading. In our coming articles we will try to explore more things on Canvas Apps.

Don’t miss the chance to participate in the upcoming Internship Program which will be done using Microsoft Dot Net Web Development Full Stack Technology. The new batch will be starting from May 20, 2024. We will have most experienced trainers for you to successfully complete the internship with live project experience.
Why to choose Our Internship Program?
Industry-Relevant Projects
Tailored Assignments: We offer projects that align with your academic background and career aspirations.
Real-World Challenges: Tackle industry-specific problems and contribute to meaningful projects that make a difference.
Professional Mentorship
Guidance from Experts: Benefit from one-on-one mentorship from seasoned professionals in your field.
Career Development Workshops: Participate in workshops that focus on resume building, interview skills, and career planning.
Networking Opportunities
Connect with Industry Leaders: Build relationships with professionals and expand your professional network.
Peer Interaction: Collaborate with fellow interns and exchange ideas, fostering a supportive and collaborative environment.
Skill Enhancement
Hands-On Experience: Gain practical skills and learn new technologies through project-based learning.
Soft Skills Development: Enhance communication, teamwork, and problem-solving skills essential for career success.
Free Demo Class Available


