How to develop Power Automate (formerly Flow) Apps for Dynamic 365 CE
Power Automate a very powerful concept to be used for robust integration requirements for cloud or native business applications.

Power Automate is a service that helps us create automated workflows between our favorite apps and services to synchronize files, get notifications, collect data and more.
We can create different type of Power Automate apps as explained below:
- Automated Flow – Triggered by an designated event automatically
- Instant Flow – Trigger manually on demand/as needed
- Scheduled Flow – Triggered as per scheduled date and time
- Business Process Flow – Guide users through multi-step processes
In this post we will see how to create a sample Automated Flow for Dynamics 365 CE Instance.
Step-1: Configure Flow initial steps
Login to Flow (https://flow.microsoft.com/) and from the Home page of Power Automate portal selct +Create then choose Start from blank as “Automated Flow”. Give the Flow name as “Create Follow-up task on Lead create in Dynamics 365 CE”.

Choose Trigger as “When a record is created” for Dynamics 365 and then click Create button.

Now it will open the Flow Designer window where we can add New Steps for our Actions.
Step-2: Add New Step Choose Action
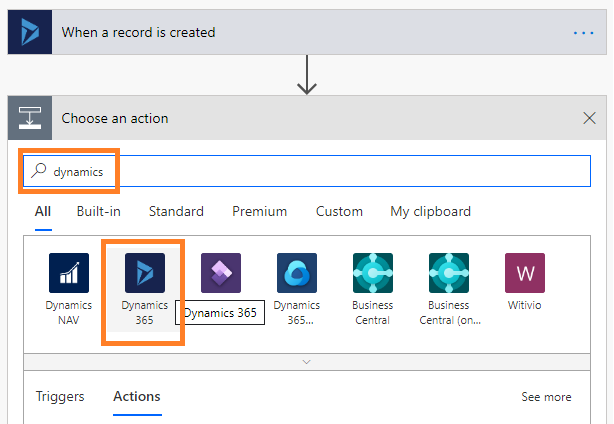
In this step click on +Add New Step and type “dynamics 365” in Search action box. Then it will suggest to choose Dynamics 365 icon as given below.
Expand the trigger and choose organization and Entity name as Lead then proceed to action addition.

Now add Action step for Create a new record for Dyanmcis 365 CE.

When you click on “Dynamics 365” icon the corresponding actions related to D365 will displayed and choose “Create a new Record” action.

On selection of “Create a new record” action provide Organization name and Entity name (Tasks) to proceed.

On the selection of the Entity some more fields will be visible and we will supply the values for the required field values as below,
- Subject : Follow-up with Lead <First name> <last name> Note : When you click on the Subject field automatically a Dynamics fly-out dialog opens to select required field. Either we can write static text or we can chhose dynamic field values from the window or we can mix static values with dynamics field values for our subject field. here we have used mix type of fileds.

- Description : Follow-up with the Lead as the Lead is a enthusiast for our product.
- Due Date : use expression as (addHour(utcNow()+3). That means the due date is 3 hour after flow executed time. The Task owner has to follow up with the Lead in 3 hours of Task creation.
- Owner : Owner (Assign from Dynamics value Lead owner)
- Owner Type : systemusers
- Priority: Lead priority (Assign from Dynamics value Lead priority)
- Priority Label: High
- Regarding: Lead (Assign from Dynamics value Lead)
- Regarding Type: leads entity

After providing all values cick on Save. Thats it.
Step-3 : Test the App
We can test the Power Automate (Flow) is working fine or not. Click on Test it will prompt a message. Whether to perform for new records manually or previous data manually. Lets choose “I’ll perform the trigger action” to run it manually test.

After pressing Save & Test It will show a message to go back to D365 CE and create a Lead so that the Flow will run and do its work.

Now go back to D365 CE and create a Lead and check back the flow status.

After Saving the Lead record go back to Power Automate screen you can see the Ran Successfully message.

Now if you refresh the Lead again you can see the task showing in Timeline section.

When you open the Task record from Timeline the Task will show all values we have set at the App design

Thanks for reading the post.

Don’t miss the chance to participate in the upcoming Internship Program which will be done using Microsoft Dot Net Web Development Full Stack Technology. The new batch will be starting from May 20, 2024. We will have most experienced trainers for you to successfully complete the internship with live project experience.
Why to choose Our Internship Program?
Industry-Relevant Projects
Tailored Assignments: We offer projects that align with your academic background and career aspirations.
Real-World Challenges: Tackle industry-specific problems and contribute to meaningful projects that make a difference.
Professional Mentorship
Guidance from Experts: Benefit from one-on-one mentorship from seasoned professionals in your field.
Career Development Workshops: Participate in workshops that focus on resume building, interview skills, and career planning.
Networking Opportunities
Connect with Industry Leaders: Build relationships with professionals and expand your professional network.
Peer Interaction: Collaborate with fellow interns and exchange ideas, fostering a supportive and collaborative environment.
Skill Enhancement
Hands-On Experience: Gain practical skills and learn new technologies through project-based learning.
Soft Skills Development: Enhance communication, teamwork, and problem-solving skills essential for career success.
Free Demo Class Available


