[Step-by-Step] Custom API in Microsoft Dataverse/Dynamics 365 Configuration and Demo with Plugin
In this post I will explain how you can configure Custom API Request, Custom API Request Parameters and Custom API Response Parameter. DataVerse supports creating custom API so that external applications call the API to perform some custom action. We can also call Plugins from the Custom API. In this post I will show you how we can configure a sample Custom API and the Custom API will call a plugin to do some action.
In this I will show you how we can call a Custom API which will call a Plugin to Recalculate Rollup field of an entity field.
We will use Postman to call that Custom Action. So let us start.
Step:1-Configure Custom API in DataVerse Environment
Open https://make.powerapps.com/ and choose your environment then create a new solution. Inside the solution Add new Custom API.

Once the new Custom API screen will open provide the Name, Display Name, Description, Binding Type.
Important Note : The Unique Name must start with Solution publisher Prefix. Then append your custom API name. for example if your prefix is “soft” and custom API name is “CalculateRollup” then the Unique Name will be soft_CalculateRollup. The Custom API will look like as below.

Once it is saved Click on Add Existing component in the solution and search the custom API and add to the solution.
Next we have to add a Custom API Request Parameter. Choose the option Add new Custom API Request Parameter and provide values. Select the Custom API, Unique Name, Name, Display Name, Type

While creating Custom API Request Parameter you have to define a Unique Name and The Type as Data type of the file d for this demo I have used String Type. Repeat this step to add 3 different Custom API Request parameter as we need 3 Request Parameters for this demo. See below 3 Request parameters I have added.


Once all Custom Request Parameters created add to the solution. Next we will add a Custom API Response parameter. Use solution and add new Custom API Response Parameter and provide required values. Choose Custom API and provide Unique Name, Name, Display Name, Description and Type as string.

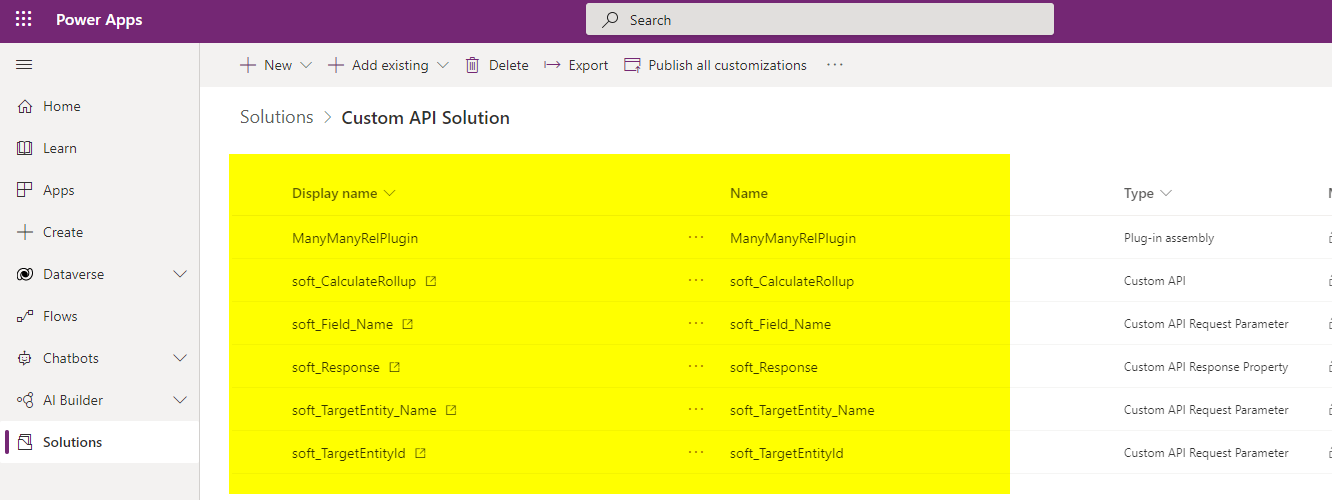
Now your solution will look like as below.

Step:2-Configure Plug-in to develop code to recalculate rollup field
Write a plugin using below code and replace your required codes if required. Once it is developed register your plugin but do not add any message step for the plugin as we want to call from Custom API.
In the code we have used input parameters passed to Custom API and set the Response parameter in plugin.
using Microsoft.Crm.Sdk.Messages;
using Microsoft.Xrm.Sdk;
using System;
using System.Collections.Generic;
using System.Linq;
using System.Text;
using System.Threading.Tasks;

namespace ManyManyRelPlugin
{
    public class CalculateRollupFieldPlugin:IPlugin
    {
        public void Execute(IServiceProvider serviceProvider)
        {
            // Obtain the tracing service
            ITracingService tracingService =  (ITracingService)serviceProvider.GetService(typeof(ITracingService));

            // Obtain the execution context from the service provider.
            IPluginExecutionContext context = (IPluginExecutionContext)serviceProvider.GetService(typeof(IPluginExecutionContext));

            string fieldName = (string)context.InputParameters["soft_Field_Name"];//cr8d1_totalfees
            var targetEntity = (string)context.InputParameters["soft_TargetEntity_Name"];//cr8d1_student
            var targetId = (string)context.InputParameters["soft_TargetEntityId"];

             IOrganizationServiceFactory serviceFactory =
                (IOrganizationServiceFactory)serviceProvider.GetService(typeof(IOrganizationServiceFactory));
            IOrganizationService service = serviceFactory.CreateOrganizationService(context.UserId);

            try
            {
                CalculateRollupFieldRequest crfrRequested = new CalculateRollupFieldRequest
                {
                    Target = new EntityReference(targetEntity, new Guid(targetId)),
                    FieldName = fieldName
                };

                CalculateRollupFieldResponse responseRequested = (CalculateRollupFieldResponse)service.Execute(crfrRequested);
                context.OutputParameters["soft_Response"] = "Rollup field Updated successfully.";
            }
            catch (Exception ex)
            {
                tracingService.Trace("CalculateRollupField Exception: {0}", ex.ToString());
                throw;
            }
        }
    }
}
The plugin registration will look like as below.

After the plugin Registered. Add the plugin assembly inside the solution. Now open the Custom API and associate the Plugin Assembly in Plugin Type field of Custom API record.

After all these steps Publish all Customizations of the solution and the final solution will look like as below with all components.

Step:3-Let us test if the Custom API works as expected
Now we will test. Before testing let us check if the Custom API is available in Metadata URL or not. Use the below URL and search for your Custom API name you can see now.
https://<yourcrmurl>.crm.dynamics.com/api/data/v<version>/$metadata
For me it is https://softchiefaug2021.crm.dynamics.com/api/data/v9.2/$metadata .

But if you hit the URL with your Custom API you will get . You will get “No HTTP end point found” but when we call by using POST method we will get result.
URL : https://softchiefaug2021.crm.dynamics.com/api/data/v9.2/soft_CalculateRollup

Now open POSTMAN and Configure an Environment. If you have not done environment configuration Read This Blog to understand how to configure Environment for your DataVerse environment. After this configuration Choose the environment and create a new Request. provide the JSON request and in the Verb Choose POST. In the URL provide the Custom API URL as mentioned above.
Now you will see the response message received and the Recalculate Plugin executed.

TEST RESULT:
The total fees is 1789 and which is updated on 18-Aug-2021 10:49 PM. Let us add a new course .

Now I have added a new Course.

Still the Fees is not recalculated.

Now call the Custom API from Postman. Then if you refresh the Student you will see the field value recalucated.

Hope It helps..

Don’t miss the chance to participate in the upcoming Internship Program which will be done using Microsoft Dot Net Web Development Full Stack Technology. The new batch will be starting from May 20, 2024. We will have most experienced trainers for you to successfully complete the internship with live project experience.
Why to choose Our Internship Program?
Industry-Relevant Projects
Tailored Assignments: We offer projects that align with your academic background and career aspirations.
Real-World Challenges: Tackle industry-specific problems and contribute to meaningful projects that make a difference.
Professional Mentorship
Guidance from Experts: Benefit from one-on-one mentorship from seasoned professionals in your field.
Career Development Workshops: Participate in workshops that focus on resume building, interview skills, and career planning.
Networking Opportunities
Connect with Industry Leaders: Build relationships with professionals and expand your professional network.
Peer Interaction: Collaborate with fellow interns and exchange ideas, fostering a supportive and collaborative environment.
Skill Enhancement
Hands-On Experience: Gain practical skills and learn new technologies through project-based learning.
Soft Skills Development: Enhance communication, teamwork, and problem-solving skills essential for career success.
Free Demo Class Available


