[Step-by-step] Connect Dynamics 365 Online from Postman using WebAPI Auth 2.0 Authentication
Postman is a very robust application software for testing Web APIs. Dynamics 365 supports Web API interactions to communicate with table data from Public clients using access tokens or ID tokens. Also we can use OAuth 2.0 Authentication to connect for performing WEB API operations. Lets see here step by step how we can connect Dynamics 365 or Dataverse online from POSTMAN software.
Step:1 – Register an application in Azure Active Directory
The first thing is to register an application using Azure Active Directory. Open Azure Active Directory by clicking the link https://aad.portal.azure.com/ Click on the Azure Active Directory link from left panel and Navigate to App Registration option.

Click on +New registration button to register a new app. In the Register an application screen provide the below options.
- Name : Postman Access (Note : you can give a name as per your choice)
- Supported account types : Choose Accounts in any organizational directory (Any Azure AD directory – Multitenant)
- Redirect URI (optional) : http://localhost (Note : you can give a name as per your choice)
Now your registration form will look like as below. After that click on Register.

Once you save the application will register successfully. Next we have to add API Permission for the same app we have just created. Being on the same application page click on API Permissions option and choose + add a permission. The Request API Permission window will appear where you need to select Dynamics CRM.

As soon as you select Dynamics CRM you will be presented the permission window. Select “Delegated permission” and Check the User Impersonation then click Add Permission button.

Now after the permission assigned we have to Grant Admin Consent. Click on the Grant Admin Consent then click YES to complete the Grant.

After the you can verify the permissions are granted admin access.

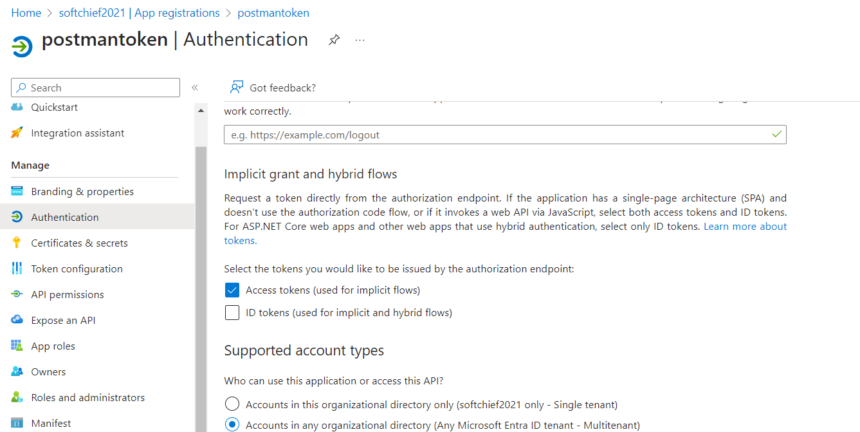
Next go to Manifest option and change the allowPublicClient flag to true.

Enable Token for the App.
Now we are ready to use the application in Postman software. Before exiting from Azure Active Directory note two things. Copy the App ID and Redirect URLs.
To copy these info navigate to Overview and click on the copy icon besides Application (client) ID option. paste in a note pad for future reference.

Like that note the Redirect URL by clicking Redirect URLs option and note the Redirect URL we have given at initial time.


So now we are done with first step Now we have two things:
- Client ID: 6c79a735-77ec-4ef6-94af-75f1b0206109
- Redirect URL : http://localhost
We have successfully registered an App in Azure Active Directory.
Step:2 – Configure Postman to connect Dynamics 365 Online
Now open the Postman software if you have downloaded. Its free to use. Once you open the Postman click on +New from home page and choose environment. We are going to create an environment.
Give a name of the environment and add 6 variables.
- URL : use your environment URL. To get the URL open any model driven app of your environment and copy the browser address bar URL from start to till .COM as given below.

- Version : we need to specify which version of Web API used. to know this navigate to Advanced Settings -> Customization->Developer Resource now note the version as for me its 9.2

- ClientID : This is the value which is copied from Azure Active Directory App from step 1.
- CalllbackURL : http://localhost (This value is also captured from step 1.
- authURL : https://login.microsoftonline.com/common/oauth2/authorize?resource={{url}}/ (Note : here the url is used as a variable in Postman)
| Variable Name | Value |
|---|---|
url | https://softchiefaug2021.crm.dynamics.com/ |
version | 9.2 |
webapiurl | {{url}}/api/data/v{{version}}/ |
| clientid | 6c79a735-77ec-4ef6-94af-75f1b0206109 |
| callbackurl | http://localhost |
| authurl | https://login.microsoftonline.com/common/oauth2/authorize?resource={{url}} |
So in the Postman Environment creation screen I have given all variables with values. Now the screen will look like as below: Now click on Add. Then click close. you will see the environment added.

Now select the environment we just created by clicking the Environment dropdown from right top corner.

Now click on Create Request.

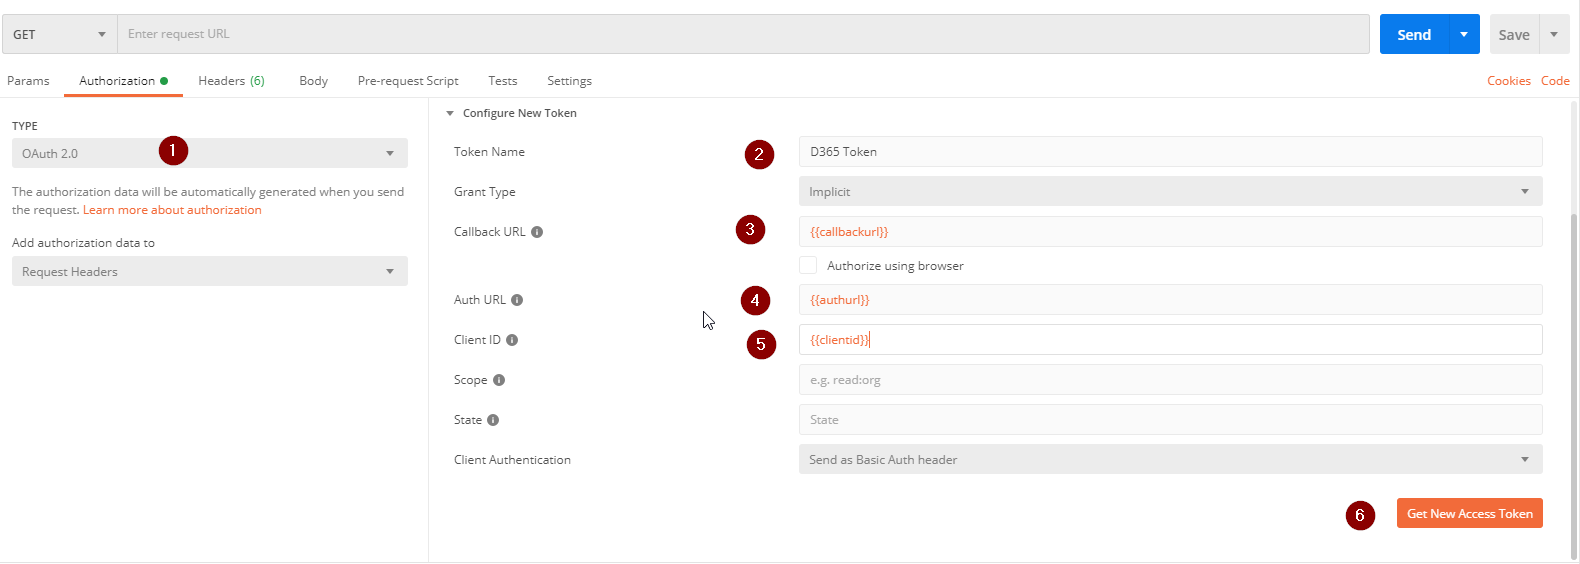
Go to Authorization tab. From the Dropdown Select OAuth 2.0. Now we will provide the variable values to generate token. Give a name of token Choose Grant Type Implicit and provide corresponding variables for Callback URL, Auth URL and Client ID. Then click Get new Access Token.

It will prompt you to login Dynamics 365 after you provide your authentication the token will generate.

Now click on Use token button.

We have successfully connected with Dynamics 365 Online form Postman. Now we have to test.
Step-3: Test API Access from Postman
To test this go to request option and choose Get. and in the address bar paste the address as {{webapiurl}}/accounts and click on Send.

Now you will get all accounts from your server. if you copy the Raw data result and paste in a JSOn viewer you can check the result in a formatted way.


Now you can perform all required Basic Web API operations. To use basic web API operations refer Microsoft site here.

Don’t miss the chance to participate in the upcoming Internship Program which will be done using Microsoft Dot Net Web Development Full Stack Technology. The new batch will be starting from May 20, 2024. We will have most experienced trainers for you to successfully complete the internship with live project experience.
Why to choose Our Internship Program?
Industry-Relevant Projects
Tailored Assignments: We offer projects that align with your academic background and career aspirations.
Real-World Challenges: Tackle industry-specific problems and contribute to meaningful projects that make a difference.
Professional Mentorship
Guidance from Experts: Benefit from one-on-one mentorship from seasoned professionals in your field.
Career Development Workshops: Participate in workshops that focus on resume building, interview skills, and career planning.
Networking Opportunities
Connect with Industry Leaders: Build relationships with professionals and expand your professional network.
Peer Interaction: Collaborate with fellow interns and exchange ideas, fostering a supportive and collaborative environment.
Skill Enhancement
Hands-On Experience: Gain practical skills and learn new technologies through project-based learning.
Soft Skills Development: Enhance communication, teamwork, and problem-solving skills essential for career success.
Free Demo Class Available


One Response
[…] open POSTMAN and Configure an Environment. If you have not done environment configuration Read This Blog to understand how to configure Environment for your DataVerse environment. After this configuration […]
Comments are closed.