Ribbon workbench (Part-2) for Dynamics 365- Add a custom button on entity form in Account with URL Action command
In our previous article we have seen how to install ribbon workbench in Dynamics 365. In this post we will see how we can add a simple button on Account entity form.
Step:1 – Create a solution in Power Apps
Open make.powerapps.com choose correct environment and click on Solutions option then create a new solution. Give a name of solution, version, select default publisher and click create.

open the solution just created and add the Account entity without any sub component using Add Existing option.

Now Publish All Customization and proceed to next step.
Step:2- Open Ribbon Workbench and choose solution
On Power Apps screen click on gear icon and click on Advanced Settings. The Advanced settings option will open the advanced settings area and then select Solutions area. at the top you will see option Ribbon Workbench then it will open the tool.

Now select the Solution created from solution pop-up screen on Ribbon Workbench tool.

now it will load the entity in ribbon workbench. The Ribbon workbench will show multiple areas at he top it shows Home then Subgrid and then Form section. You need to select the correct area to add buttons. For our example we are going to add button on Account form so the section required is FORM.

Click on on the BUTTON option from left bottom option and drag the button on the Form section and drop at right place like as I placed the button after Save button.
Now click on the commands option and click plus icon to add an action. we can choose URL action or JavaScript action for a button.
Let us choose URL action and in the URL action and in the address mention the target URL as “https://www.google.com”


Now go to Button option and provide the button label and choose the command.

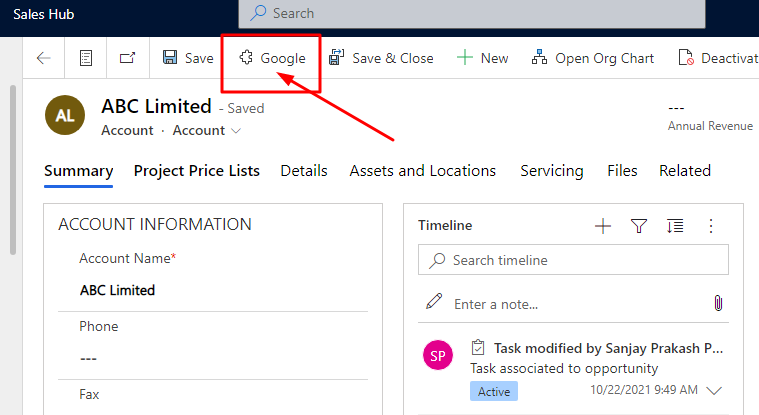
Now click on Publish and it will take some time to publish. Once published open Account form now you can see the button showing on command bar of account form and on clicking the button it will open google site.

Hope This helps.
Follow my blog for more trending topics on Dynamics 365, Azure, C#, Power Portals and Power Platform. For training, Courses and consulting, call to us at +91 832 886 5778 I am working more for community to share skills in Dynamics 365 and Power Platform. Please support me by subscribing my YouTube Channel. My YouTube Channel link is this : https://www.youtube.com/user/sppmaestro

Don’t miss the chance to participate in the upcoming Internship Program which will be done using Microsoft Dot Net Web Development Full Stack Technology. The new batch will be starting from May 20, 2024. We will have most experienced trainers for you to successfully complete the internship with live project experience.
Why to choose Our Internship Program?
Industry-Relevant Projects
Tailored Assignments: We offer projects that align with your academic background and career aspirations.
Real-World Challenges: Tackle industry-specific problems and contribute to meaningful projects that make a difference.
Professional Mentorship
Guidance from Experts: Benefit from one-on-one mentorship from seasoned professionals in your field.
Career Development Workshops: Participate in workshops that focus on resume building, interview skills, and career planning.
Networking Opportunities
Connect with Industry Leaders: Build relationships with professionals and expand your professional network.
Peer Interaction: Collaborate with fellow interns and exchange ideas, fostering a supportive and collaborative environment.
Skill Enhancement
Hands-On Experience: Gain practical skills and learn new technologies through project-based learning.
Soft Skills Development: Enhance communication, teamwork, and problem-solving skills essential for career success.
Free Demo Class Available


2 Responses
[…] our previous article we have seen how we can add a button and on click on button how to open an external or internal […]
[…] par-2 – how to to add button in dynamics 365 using ribbon workbench […]
Comments are closed.